Level5 Drywall Corner Finisher


Level5 Drywall Corner Finisher
SKU
N/A
Categories Automatic Taping Tools, Plaster & Tools
$599.00 - $648.00 + GST
$688.85 (incl. GST)
- THE PERFECT INSIDE CORNER | Corner finishers provide a professional-grade finish with a sharper corner than can be achieved using a flusher-style finishing head.
- A FASTER FINISH | Increases efficiency dramatically versus hand finishing by finishing both wall surfaces of the inside corner simultaneously.
- PREMIUM QUALITY | Precision-machined billet aluminum body and color anodized for corrosion resistance and durability. The outer frame is precision-machined from premium stainless steel and robotically-welded for long-term structural integrity.
- ULTRA-SMOOTH OPERATION | Rubber-tired wheels enable the corner finisher to glide over the surface of the taped corner, reducing friction and the possibility of the tape moving during the initial glazing step.
- A SIZE TO SUIT YOUR NEEDS | Available in four sizes. The most common pairing is a 3” for the initial tape “glazing” coat and a 3.5” for the second fill coat. The larger second corner finisher ensures corners are feathered out for minimal sanding.
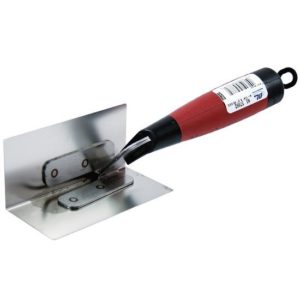
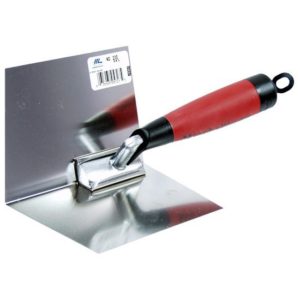
- The corner finisher (also called an “Anglehead”) is used to fill and feather-finish inside 90 degree taped corners after the tape has been bedded down with a corner roller. The corner finisher increases efficiency dramatically versus hand finishing by finishing both wall surfaces of the inside corner simultaneously. Corner finishers provide a professional-grade finish with a sharper corner than can be achieved using a flusher-style finishing head.
LEVEL5 Corner Finishers are available in 2.5”, 3”, 3.5” and 4” sizes. Their body is precision-machined from billet aluminum that has been color anodized for corrosion resistance and long-term durability. The proven channel design distributes the compound evenly and efficiently across the corner finisher during the finishing process. Also, unlike competitive models that are screwed together, the outer frame is precision-machined from premium stainless steel that has been robotically-welded to ensure a long-term, leak-proof fit. To ensure ultra-smooth operation, LEVEL5 Corner Finishers come with long-lasting, rubber-tired wheels that ensure they effortlessly glide over the taped corner.
The finishing blades are made of premium carbide steel for long wear life and come preset for optimal finishing straight out of the box. The wings on the 3”, 3.5” and 4” versions feature additional tension springs that enable them to accommodate minor angle imperfections while still providing clean, sharp corners. There are spring-loaded pins that enable you to deactivate one or both of these tension springs based on your preference.
For mounting, LEVEL5 Corner Finishers feature a universal stainless steel ball socket that will fit the ball-end handles, applicator boxes, and compound tubes from leading drywall tool manufacturers. The ball-end snaps securely into the ball socket using a locking retainer clip. The corner finisher can be easily removed using the spring-loaded quick release tab.
2G UPDATES & ENHANCEMENTS
- The body of the corner finisher is now precision-machined from billet aluminum instead of cast aluminum for added strength
- The aluminum body has been color anodized for enhanced corrosion resistance
- The tires on the wheels have been upgraded to a higher durometer rubber to provide a longer wear life
-
SUGGESTED USAGE
Corner finishers are typically used in pairs. Below are the two steps to finishing a perfect inside corner with your corner finishers: Step One: The “Glazing Coat”- After bedding the tape into the inside corner using a corner roller (SKU #4-707), you’ll find excess bedding compound squeezed out from behind the tape. Don’t remove this compound. Attach your smallest corner finisher (usually a 3”) to a corner finishing handle using a ball-end attachment (such as SKU #4-779). Use this combination to pick up the excess compound and glaze the tape. The result will be a thin compound layer on the tape with filled tape bevels, leaving no lines visible. Allow this glazing coat to dry before moving to Step Two.
- Avoid applying a dry corner finisher on the wall, as it could damage the tape. Always prime your corner finisher before the first pass by filling its external “wings” with joint compound from your bucket until it’s level with the frame edges. PRO TIP: After priming, also dip the corner finisher in a bucket of clean water for extra lubrication before applying it to the wall
- Mount your largest corner finisher (usually a 3.5”) onto a corner applicator box (such as SKU #4-701), a MiniShot™ Gas-Assisted Compound Tube (SKU #4-772), or a semi-automatic compound tube (SKU #4-741). Prime the corner finisher as directed in Step One before starting your first pass. Be sure to eject a small amount of mud through the ball end nozzle into the corner finisher to remove any air pockets. Then use the applicator box or tube to apply a uniform compound layer through the corner finisher onto the wall. With the right compound consistency, you should achieve a sharp corner, fully covered tape flanges, and a feathered edge. Once dry, a light sanding is all that is required for a perfect, professional inside corner, ready for priming and painting.
TIPS AND TRICKS
- For vertical inside corners, initiate from the top, pulling the corner finisher downwards until about 2-3 feet from the bottom. Then, invert the finisher and pull upwards from the bottom to meet at the center. The same method applies to horizontal corners; start from one corner and draw across the wall until 2-3 feet from the opposing corner, then reverse the finisher and pull from the opposing corner towards the middle.
- A popular choice among LEVEL5 users is the 3” finisher for the initial tape glazing coat and a 3.5” for the final fill coat. The larger finisher for the final pass ensures a feathered corner that requires minimal sanding.
- Use a 2.5” corner finisher for tighter spaces such as inside corners near doorways or above windows, where a larger finisher may not fit.
- The 4” corner finisher is perfect for remodeling projects involving sub-optimal inside corners, as it is more forgiving than the 3.5”.
Reviews
Related products

R&S TRADE FOR ALL YOUR TOOLS AND SUPPLIES
R&S Trade Centre is your Number 1 trade shop for the supply of specialised painting tools and products like wallpaper, paint, plaster, masking tape, ladders and much more. As part of a buying group with members in Wellington and Auckland, we’re able to source and supply a large range of new and innovative products at the very best prices. For you, that means you’re getting the best selection of products at the best prices—the best of both worlds! Ask about our bulk buys today and take advantage of our bulk purchase discounts.